90 App Screenshots in 8 minutes

One of the tedious chores with mobile apps are the screenshots for Play Store and AppStore, especially because this is the only way how you can showcase the app to potential uses. Also as app grew, it may get even more time consuming since the number of screenshots, supported languages, pre-configurations and features increases over time.

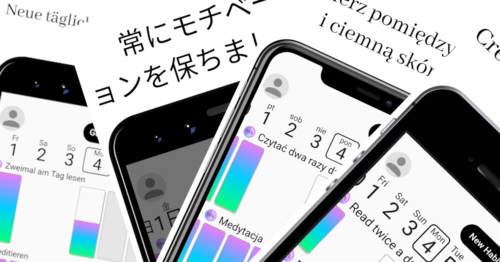
As of now, HabitChallenge app has 90 image files representing permutations of presented screens, languages, devices and supported systems. I really DO NOT want to take all of them manually!!

Here is how I’m doing this right now in fully automated way and can get all of the 90 screenshots after each release in about 8 minutes!

HabitChallenge App Screenshots with different screens, in different languages on different devices.

HabitChallenge is written in Flutter right now, and since Flutter controls every single pixel on the screen, has an awesome google_fonts library… and device_frame… and flutter_driver. We can create whole screenshot using dart and flutter!! Without the need for any graphical processing in Photoshop or Gimp! We can upload them straight to the store using fastlane!

OK, let’s stop bragging and dive into technical details!

What are the main ingredients?

  • canvas – each store defines different sizes for app screenshots, this will limit the overall size of the final image, also this is where background colour or image can be set,
  • header text – about 1/5 of the image height is reserved for the localised header text,
  • device frame,
  • featured app screen – localised app screen with example data.

0. The Emulator

Actually, before we even start with a first of line of code, we should think from where we’ll get the images. The first thought is from the phone emulator, as we always work with phone emulators, right?

Not quite so. Yes, we’ll create a screenshot for the phone listing in the store, but we also need to remember that each device (and emulator) have different screen resolution and density. Plus we probably don’t want to be bothering about screen safe areas, status and navigation bar. If we use emulator that have the same screen size as our screenshot, we’ll end up with screenshots slightly shorter.

The solution here is to create a new type of device that would have enough screen real estate to fit desired screenshot and not crop it vertically nor horizontally.

Another approach to solving this issue, may be using Flutter web or desktop, but it was easier for me to create huge tablet emulator than explore new Flutter environments.

I’ve created new (TV) android emulator with screen size of 25″ and resolution of 3000x4500px. This beast can easily fit all of the screenshots I need.

Android TV emulator running screenshots.

Now, we can look through code samples!

1. The Canvas

Here is the main part of our screenshot, the canvas! It is doing a bit more then just adding a white background.

First of all (1), it is setting the stage of our green screen and center everything inside of it.

Secondly (2), it is setting proper width and height for the real canvas. It is important to note, that we need to divide required screenshot size (in pixels) by the device pixel ratio so that resulting image actually have the width and height we expect. Here we also set the background colour and clip the overflowing edge. TBH, we can skip the clipping, since we’ll crop the whole image using dart’s image library later on.

Next (3), we’re dealing with the localisation of the header text. Since we want the header text to match application language, we need to create Localizations widget and provide it with the configuration. Then, create ScreanshotHeader that is also responsible for the font size and text presentation.

Finally (4), we add the device it self with an embedded screen.

Continue reading

Bring Your Own Reducer

Lets talk redux for a brief moment. As you may know there are three main ingredients in redux:

  • action,
  • reducer,
  • store.

From the first look this kinda makes sense. You have your store with is actually your app current state. Reducers are pure functions, as such they are disconnected form everything, just take current state, and action to produce new state. Finally, actions, those are like messengers, caring around data for a reducer (transformer).

Since all actions are (or at least should be) easily serializable, you get this amazing feature of time traveling within your app.

On a down side. It makes it bit harder to reason about the code. Since actions and reducers may be defined in separate files. Also, sometimes the same action may be used with different reducer in potentially many different places. A lot things can happen since you have a freedom to mix-and-match actions and reducer!

Can we do better?

I think we can! Some time ago I have found async_redux library and since then cannot live without it! In HabitChallenge app I went from Provider to rx_command to async_redux and I do not plan to move again!

What is all the fuss with your own reducer? In async_redux, each action is a subclass of ReduxAction, that have an abstract reduce() method. So each action, defines its own parameters and have bundled in reducer. Then you are dispatching it as normal redux action.

This way action and reducer are always together, in one file, even more, in one class!

Inside of ReduxAction you have access to whole state object. So you can use it for computation (if needed) or to get additional data for your REST endpoints.

reduce() method of course returns whole new state, so you can modify different parts of your app/state at one go, in a single action.

ReduxAction have useful before() and after() methods. In case you need to do something before and/or after the action. Like show and hide progress indicator somewhere in the UI.

If you need to process errors there is wrapError() method. And global error listener!

Whats more, each of before(), reduce() and after() can be asynchronous! Can also dispatch other actions using dispatch() call!

Instead of middleware, there is an ActionObserver interface so that you can do some fancy side effects! If you want to.

Also StoreConnector widget forces you to use View pattern for all of your widgets! This is also the place where your UI and state meets! Where you extract data from state to show to the user and where you initially dispatch actions.

If you care about your app performance, you should definitely give a try for async_redux. Since BaseModel class (one that is use to bind your UI to the store) lets you define list of properties that when changed will re-render the widget. Otherwise widget will stay as it is. This is so awesome, because you can use values that were computed base on current state, no need to include all the parts from your store!

Have I mentioned about test-ability? There is a dedicated StoreTester class, that lets you easily define initial state, then execute an action(s) and verify resulting state. It also lets you check all the actions that were fired (if any) and also verity order and parameters of actions. Finally you can of course verify the state it self.

The key takeaway from all of this, is that you should at least scan through async_redux README.md file and give it a try in a free moment.

Size Matters!? Shaving Size of Your Flutter App

Probably APK (or app bundle) and IPA size is not something that is causing you sleepless nights. At least it isn’t for me.

We know that there are some tradeoffs when going cross-platform route. Most of people will name performance or look-and-feel as main concerns. Maybe some will mention the deliverable size. This is what I will tackle in this blog post. The size of your app for the end user.

Of course, going the cross-platform route we accept that our deliverable would be bigger. The main reason is that platform does not provide the runtime for our out app. We always need to ship everything to start and run our app.

Why should you care about your download size? In most cases there are two, three, or thirty other apps that will do exactly the same thing as yours. If your potential user need to wait one more minute to install yours app, this is potential one minute when he/she can give a try for a competitor app. This is also more time when something may go wrong, more bytes to transfer means higher probably that something will go wrong with the internet connection etc.

Also smaller app size may be a factor for the Play/AppStore listing. As Apple/Google needs to push all of that data to the user and they need to pay for the upload 😀 (just kidding ;)). But anyway, at least Play Console shows how your APK size compares to the app category median.

Some basic things you can find in this blog post, I will cover all the rest ;). Would recommend you go over this blog first, configure progurad etc. and get back here for more!

R8

This is Android specific. It is a successor to proguard, that can also remove not used resources. You can enable it by adding android.enableR8=true to android/gradle.properties (although it may be already enabled). One thing to note is that it may remove not used resources, like eg. your notification icon, please follow instructions from flutter_local_notifications in order to keep your notification icon.

Fonts

If your app uses custom fonts, I would recommend finding alternatives in Google Fonts, and then adding google_fonts to your dependencies. You may wonder how additional dependency may reduce your APK size? Well, first of all you may remove all other fonts from your project. Secondly google_fonts will dynamically download font when it is used and it will download it in a specific style and language, so that you don’t need to ship all of the variation with your project. Yes, this is another tradeoff, most probably fonts will be downloaded on app initial start… but it is less bytes to push when app is installed.

Icons

You probably use a few icons either from Icons or CupertinoIcons class. Normally this means that all of the icons are embedded into your Flutter bundle. But since flutter 1.17, you can add --tree-shake-icons option to flutter build command, that would remove all of the not used icons from the bundle. Few more bytes shaved!

Split Debug Info

You probably don’t want to include Dart debug information in your production release. --split-debug-info is another option you can add to flutter build command to store debug information separately. This option takes additional argument that is a directory where debug information should be stored.

In case of my HabitChallenge app, I have created a git submodule, where I automatically store, and tag, debug information after the release.

Then when you need to add debug information to your stacktrace, you can use flutter symbolize command and point to appropriate version of debug-info.

Putting All Together

In my case, I have created bash scripts that handle the release process (let me know if you are interested to know how I do releases for HabitChallenge).

Android

For android things are fairly easy, since you can manually upload APK(s) or App Bundle to Play Console (or point fastline to do it for you automatically).

Continue reading

Random messages in Dart intl

As people, we are always craving novelty, things that we are familiar with makes us feel cozy but also do not attract as as much they were right on the beginning. This why your app should constantly engage the user. How to achieve this? You can for example have multiple messages for same operations.

In HabitChallenge there are two features that have multiple localized messages:

  • local notifications,
  • streak detection.

Each notification will have different message in form of a question, asking if you already did your habit.

For streak detection it is a bit more complex. Each streak message depends on the streak length and has not only random message, but also header and text that you can share with your friends.

Nevertheless both require a way of providing pseudo random message in one of the supported languages. Plus some of the languages have more options than others (yes, Polish users are less likely to see the same message in row).

In react-native times, this was easy! Since i18n-js relays on JSON configuration file, I was able to get extract translated raw list, then it was easy to check its size and finally generate random number within given range.

It is not as easy in Flutter. Mainly because initially I decided to go with the standard localization library intl, and learned half way through that I cannot use the same approach as I had in react-native with it.

You may ask why? First of all intl does not use JSON to store translations, but specialized ARB files. Main advantage of ARB is that it is supported by software that is used by professional translators.

The downside, is that only data structure that it supports is a map and you can’t access it directly. This makes things a bit harder… but there is more!

intl, does not use ARB files directly, they are only used as a transportation layer. With intl you can extract all messages from your app into ARB file, give this file to translation team (if you are lucky to have one). Then get back one ARB file per language and import them back to your app as dart source files.

Yes, there is some black voodoo magic with code generation in between. When you get ARB files, you need to run them through intl command line tools, to generate dart file with translation.

With code generation there are also some limitations. You can use placeholders, but you can’t call any methods on them. Instead of passing an object and extracting its properties, you need to pass each property separately as a parameter 😐

Enough talking, lets jump into the code. Or at least lets start talking code 😉

As I mentioned before, intl have support for maps… not exactly map data structure, but at least we can think about it as a map. I am talking here about Intl.select() where you can select one option base on provided key. Lets try to use it:

Continue reading

From React-Native to Flutter in 531 Commits

Here is a recording of my FlutterLDN talk about ReactNative and Flutter.

First commit for the HabitChallenge app was created on 27th of July 2017. Back then there were no other choices than to go with react-native and JavaScript.

Since then I did 3220 commits and 244 releases. App was downloaded over 140k times on Google Play and AppStore.

I am considering this a huge success, taking into account that HabitChallenge is my first mobile app and I did virtually no marketing for it!

Long story short on 7th of August 2019 I have decided to start from scratch with Flutter taking all my learning from react-native and writing every single widget and feature once again.

After 531 commits (yes, this is the actual number of commits from git history) on 24th of December, HabitChallenge 5.0 was released on Google Play!

In the talk I am comparing side by side the same widgets implemented in react-native and Flutter. This is a unique real world comparison of two technologies that lets you achieve the same effect… but with different cost.

Which one do you think is more efficient? React-Native? Flutter? You will know my conclusion after watching the talk on YouTube!