
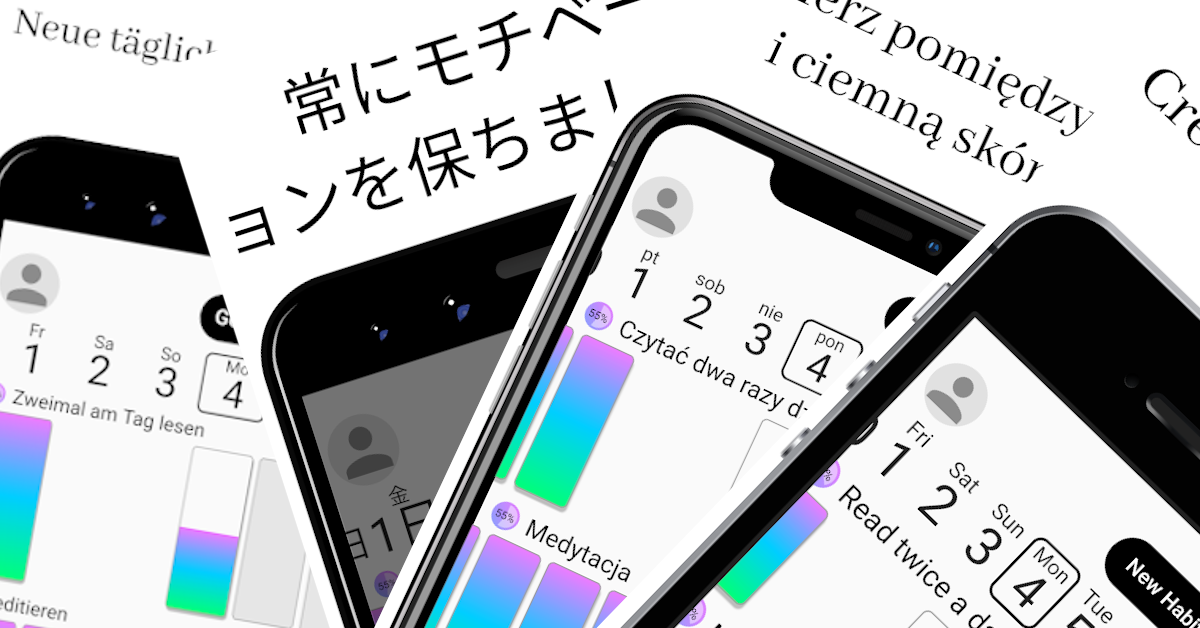
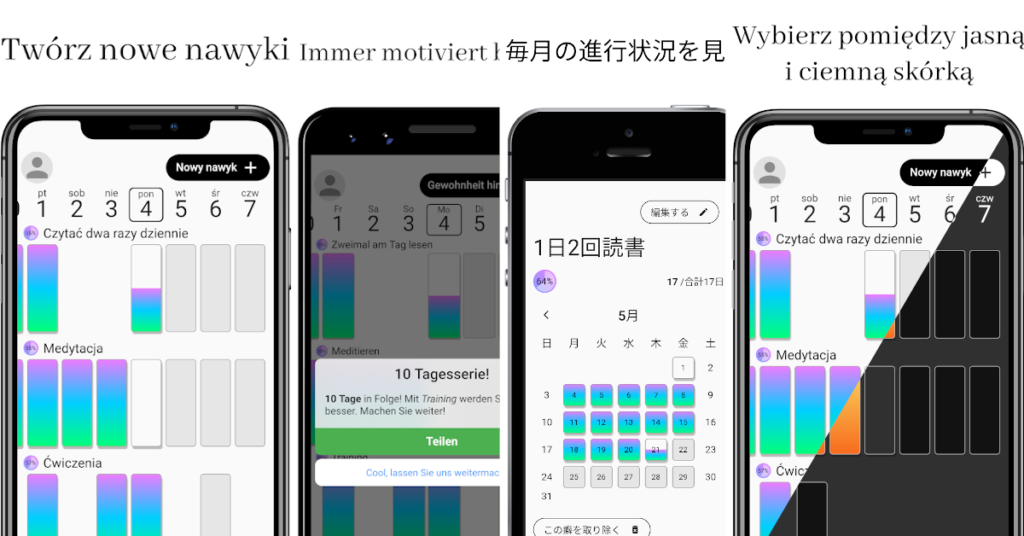
One of the tedious chores with mobile apps are the screenshots for Play Store and AppStore, especially because this is the only way how you can showcase the app to potential uses. Also as app grew, it may get even more time consuming since the number of screenshots, supported languages, pre-configurations and features increases over time.
As of now, HabitChallenge app has 90 image files representing permutations of presented screens, languages, devices and supported systems. I really DO NOT want to take all of them manually!!
Here is how I’m doing this right now in fully automated way and can get all of the 90 screenshots after each release in about 8 minutes!
HabitChallenge is written in Flutter right now, and since Flutter controls every single pixel on the screen, has an awesome google_fonts library… and device_frame… and flutter_driver. We can create whole screenshot using dart and flutter!! Without the need for any graphical processing in Photoshop or Gimp! We can upload them straight to the store using fastlane!
OK, let’s stop bragging and dive into technical details!
What are the main ingredients?
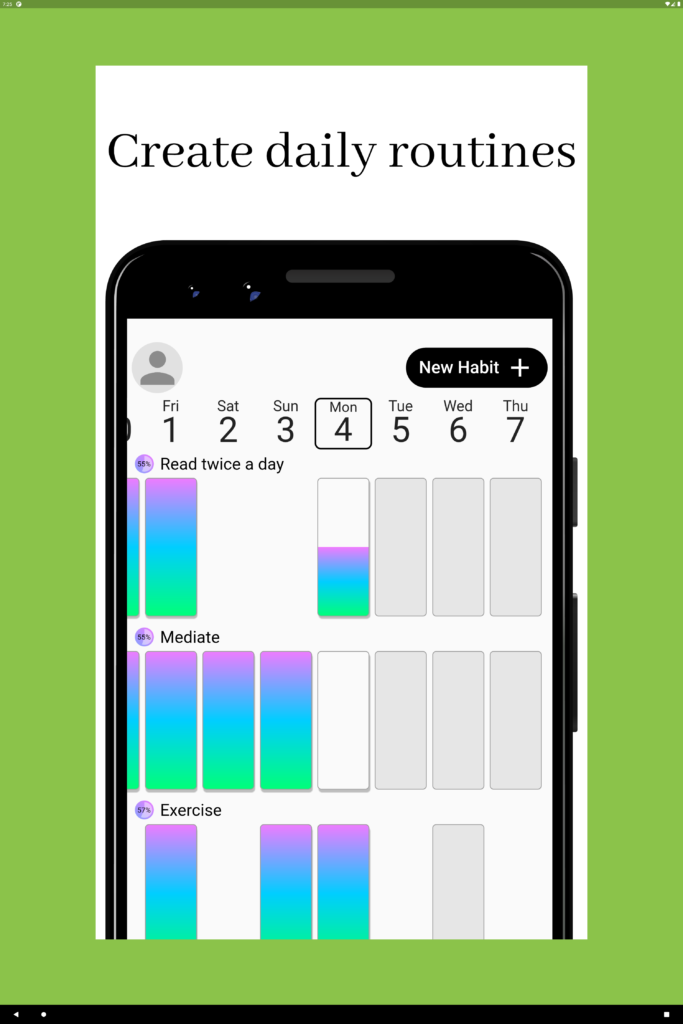
- canvas – each store defines different sizes for app screenshots, this will limit the overall size of the final image, also this is where background colour or image can be set,
- header text – about 1/5 of the image height is reserved for the localised header text,
- device frame,
- featured app screen – localised app screen with example data.
0. The Emulator
Actually, before we even start with a first of line of code, we should think from where we’ll get the images. The first thought is from the phone emulator, as we always work with phone emulators, right?
Not quite so. Yes, we’ll create a screenshot for the phone listing in the store, but we also need to remember that each device (and emulator) have different screen resolution and density. Plus we probably don’t want to be bothering about screen safe areas, status and navigation bar. If we use emulator that have the same screen size as our screenshot, we’ll end up with screenshots slightly shorter.
The solution here is to create a new type of device that would have enough screen real estate to fit desired screenshot and not crop it vertically nor horizontally.
Another approach to solving this issue, may be using Flutter web or desktop, but it was easier for me to create huge tablet emulator than explore new Flutter environments.
I’ve created new (TV) android emulator with screen size of 25″ and resolution of 3000x4500px. This beast can easily fit all of the screenshots I need.
Now, we can look through code samples!
1. The Canvas
Here is the main part of our screenshot, the canvas! It is doing a bit more then just adding a white background.
First of all (1), it is setting the stage of our green screen and center everything inside of it.
Secondly (2), it is setting proper width and height for the real canvas. It is important to note, that we need to divide required screenshot size (in pixels) by the device pixel ratio so that resulting image actually have the width and height we expect. Here we also set the background colour and clip the overflowing edge. TBH, we can skip the clipping, since we’ll crop the whole image using dart’s image library later on.
Next (3), we’re dealing with the localisation of the header text. Since we want the header text to match application language, we need to create Localizations widget and provide it with the configuration. Then, create ScreanshotHeader that is also responsible for the font size and text presentation.
Finally (4), we add the device it self with an embedded screen.
@override
Widget build(BuildContext context) {
  final media = MediaQuery.of(context);
  return Container( /* 1 */
    color: Colors.lightGreen,
    alignment: Alignment.center,
    child: Container( /* 2 */
      width: screenshotSize.width / media.devicePixelRatio,
      height: screenshotSize.height / media.devicePixelRatio,
      decoration: const BoxDecoration(color: Colors.white),
      clipBehavior: Clip.hardEdge,
      child: Column(
        crossAxisAlignment: CrossAxisAlignment.stretch,
        children: [
          Expanded(
            child: Localizations( /* 3 */
              locale: locale,
              delegates: const [
                AppLocalizationsDelegate(),
                GlobalMaterialLocalizations.delegate,
                GlobalWidgetsLocalizations.delegate,
                GlobalCupertinoLocalizations.delegate,
              ],
              child: Builder(
                builder: (context) => ScreenshotHeader(
                  text: config.header(AppLocalizations.of(context)),
                  style: headerStyle,
                ),
              ),
            ),
          ),
          Flexible( /* 4 */
            flex: 4,
            child: ScreenshotDevice(
              screen: config.screen(),
              locale: locale,
              device: device,
            ),
          ),
        ],
      ),
    ),
  );
}
2. Header Text
One would though that adding a heading text is an easy task… not so if you want it to be auto-scaled!
One of my requirements for this project was, no manual work. This means that there is no fixed size for the font in the header. Instead the font is scaled by Flutter based on the amount of available space and text length.
Another side effect of the responsiveness of screenshots is that we just can’t use Padding widget to add empty space around widgets. Instead (1) I’ve used FractionallySizedBox to set horizontal and vertical margins to 2% and 1% respectively.
Also, FractionallySizedBox mixed with FittedBox(2) results in the font size being automatically adjusted! This check the box with font auto-scaling.
You may be wondering why the DefaultTextStyle(3) widget is needed here. It is so, because there is no MaterialApp above this component and by default Flutter sets font colour to yellow, which is hard to see on the white background.
Finally (4), we can set the desired text!
@override
Widget build(BuildContext context) {
  return FractionallySizedBox( /* 1 */
    widthFactor: 0.96,
    heightFactor: 0.98,
    child: FittedBox( /* 2 */
      child: DefaultTextStyle( /* 3 */
        style: const TextStyle(color: Colors.black),
        child: Text( /* 4 */
          text,
          textAlign: TextAlign.center,
          softWrap: true,
          style: style,
        ),
      ),
    ),
  );
}
3. Device Frame
Finally! We can showoff our app on the device!
Not so fast, before we’ll be able to put the app screen(s) into device frame, we need to set up a few things. Without them, it won’t be rendered correctly.
First things first (1), responsive padding on both sides of the device frame. Also having a FittedBox here, with fit set to BoxFit.fitWidth, expands the device and makes it overflow on the bottom. This exactly what I want!
Now it is time for the DeviceFrame (2), where we just pass a device type that we’ve got through constructor parameter.
ThemeProvider (3) is my custom InheritedWidget that provides theme definitions (like gradients etc.) for my custom widgets. You can ignore it.
The Builder (4) widget allows us access parent widget context without the necessity to create another stateless, or stateful, widget. It is required here, because DeviceFrame overrides some of the theme properties that then needs to be provided to MaterialApp (5), like theme platform and visual density.
Also in (5) we configure the root material app widget. Important part here is to provide a key for it, in order to inform Flutter, that its content has changed. I’ve decided not to use routes, the screen is passed from the main widget as a constructor parameter. IMO this makes things simpler and faster. Especially when there is a header widget that is out of the material app flow and needs to be updated when route changes.
Finally (6), we need to restore MediaQuery data that are modified by DeviceFrame and overridden by MaterialApp. The context parameter here comes from the Builder widget in (4).
@override
Widget build(BuildContext context) {
  const theme = HabitChallengeTheme.light;
  return FractionallySizedBox( /* 1 */
    widthFactor: 0.96,
    child: FittedBox(
      fit: BoxFit.fitWidth,
      alignment: Alignment.topCenter,
      child: DeviceFrame( /* 2 */
        device: device,
        screen: ThemeProvider( /* 3 */
          theme: theme,
          child: Builder( /* 4 */
            builder: (context) {
              final frameTheme = Theme.of(context);
              return MaterialApp( /* 5 */
                key: Key(screen.runtimeType.toString()),
                debugShowCheckedModeBanner: false,
                theme: theme.materialTheme.copyWith(
                  platform: frameTheme.platform,
                  visualDensity: frameTheme.visualDensity,
                ),
                locale: locale,
                localizationsDelegates: const [
                  AppLocalizationsDelegate(),
                  GlobalMaterialLocalizations.delegate,
                  GlobalWidgetsLocalizations.delegate,
                  GlobalCupertinoLocalizations.delegate,
                ],
                supportedLocales: const [
                  Locale('en', ''),
                  Locale('pl', ''),
                  Locale('de', ''),
                  Locale('ja', ''),
                ],
                home: MediaQuery( /* 6 */
                  data: MediaQuery.of(context),
                  child: screen, /* <= here goes your app screen */
                ),
              );
            },
          ),
        ),
      ),
    ),
  );
}
4. Final Touches
OK, we have all of the necessary ingredients, but we also need a bowl to mix them together.
Here is the build method of the main widget that connects everything together and creates app that will be able to display your screenshots.
By default Flutter adds a top padding to the MediaQuery data to accommodate for the system status bar. This is breaking my simple cropping algorithm in driver test. Instead of hardcoding or sending status bar height value to driver tests, I’ve decided to set top padding to 0 in the root MediaQuery provider (1).
The Directionality (2) widget is required here, because the header component is not wrapped in the MaterialApp. Doing so would be IMO too much of an overhead, therefore simple Directionality on the app root it hardcoded.
Last but not least (3), the ScreenshotScene widget, which is actually a canvas widget from the first step.
@override
Widget build(BuildContext context) {
  final window = WidgetsBinding.instance.window;

  return MediaQuery( /* 1 */
    data: MediaQueryData.fromWindow(window).copyWith(
      padding: EdgeInsets.fromWindowPadding(
        window.padding,
        window.devicePixelRatio,
      ).copyWith(top: 0),
    ),
    child: Directionality( /* 2 */
      textDirection: TextDirection.ltr,
      child: ScreenshotScene( /* 3 */
        config: route,
        headerStyle: GoogleFonts.abhayaLibre(),
        locale: _locale,
        device: _device,
        screenshotSize: _screenshotSize,
      ),
    ),
  );
}
Those are all of the ingredients to build a showcase app that would present features of your app.
5. The Magic Sauce
You may still remember that one of the required libraries was flutter_driver, but I haven’t mentioned it… yet.
What we’ve implemented up until now is the app that will be tested using the driver tests. The sole purpose of this app is to just show screens of your main app.
Now, we need the other part of the equation, the one that would drive the app we created, grab its screens and store them as images. This is why flutter_driver is required.
Taking screenshots is easy, there is already FlutterDriver.screensthot(), so we are covered.
Navigating is bit trickier. We could of course add a button that would advance us to the next screen, then device type and language. But this would mean that the whole flow is controlled internally in the main app, tests only move it to the next frame. This doesn’t sound bad initially, but if you would like to generate screenshots only for one device or language, you’ll need to modify the app code and also adjust test code so that both are in sync.
IMO the best way is to drive everything from the driver tests. One could imagine some dropdown or radio boxes that would configure the screen… but still this is too complex and also slow since UI interaction is required.
Here comes the magic sauce, FlutterDriver.requestData(String). Yes this may be a bit of an abuse of it, but it woks perfectly for me. It communicates directly with the app and can change multiple things at once, without the need of any UI interactions.
The idea here is to put all of the configuration parameters into an object, that can be serialized and deserialized to/from JSON. Transport this JSON String from flutter_driver test, to app and apply the configuration on the app.
As of now, this transport object have only four properties:
- screen name
- language
- canvas size
- device type
On the app side I’m registering custom message handler for the flutter_driver:
enableFlutterDriverExtension(handler: (message) async {
  // decde JSON in message
  // update ChangeNotifier object
}
After message from testing code is received and decoded, my custom ChangeNotifier is updated, which triggers re-render of whole screen. This create new app screen, header text etc.
6. Putting everything together
We’re almost there… you should have already all of the informations how to re-create similar flow with your application. The last part is on your side!
I don’t know how you’re creating screens and widgets in your app, how do you structure them or what sate management solution you do use. It’s on you, to create screens that will be embedded into the device frame.
In my case, HabitChallenge uses async_redux (more about it here) so it was relatively easy for me to mock all of the necessary data in the initial redux state and just present it.
To sum things up, here is a screen recording of the final app creating all of the screenshots. Left column is executing driver tests, middle one lists final images and on the right you see the running app.
BTW. First 30s is in normal speed, rest of is 4x to not get you boared.
That was quite a journey, isn’t it? How long it takes for you to take screenshots? How often you’re doing so?
For me it was about 2h to grab all of the screens. My previous approach was based on the driver tests and imagemagick CLI to add header text.
Now I can get all of the screenshots in about 8 minutes! And they are pixel perfect, with amazing font rendering and alignment! Not to mention that I have full power of Flutter at my finger tips, can apply transformations to the device frame and screenshot, modify header so that it will accept markdown or choose one of many Google Fonts for it!