90 App Screenshots in 8 minutes

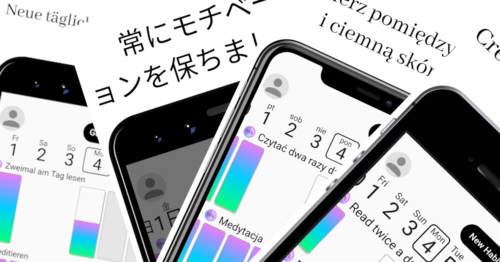
One of the tedious chores with mobile apps are the screenshots for Play Store and AppStore, especially because this is the only way how you can showcase the app to potential uses. Also as app grew, it may get even more time consuming since the number of screenshots, supported languages, pre-configurations and features increases over time.

As of now, HabitChallenge app has 90 image files representing permutations of presented screens, languages, devices and supported systems. I really DO NOT want to take all of them manually!!

Here is how I’m doing this right now in fully automated way and can get all of the 90 screenshots after each release in about 8 minutes!

HabitChallenge App Screenshots with different screens, in different languages on different devices.

HabitChallenge is written in Flutter right now, and since Flutter controls every single pixel on the screen, has an awesome google_fonts library… and device_frame… and flutter_driver. We can create whole screenshot using dart and flutter!! Without the need for any graphical processing in Photoshop or Gimp! We can upload them straight to the store using fastlane!

OK, let’s stop bragging and dive into technical details!

What are the main ingredients?

  • canvas – each store defines different sizes for app screenshots, this will limit the overall size of the final image, also this is where background colour or image can be set,
  • header text – about 1/5 of the image height is reserved for the localised header text,
  • device frame,
  • featured app screen – localised app screen with example data.

0. The Emulator

Actually, before we even start with a first of line of code, we should think from where we’ll get the images. The first thought is from the phone emulator, as we always work with phone emulators, right?

Not quite so. Yes, we’ll create a screenshot for the phone listing in the store, but we also need to remember that each device (and emulator) have different screen resolution and density. Plus we probably don’t want to be bothering about screen safe areas, status and navigation bar. If we use emulator that have the same screen size as our screenshot, we’ll end up with screenshots slightly shorter.

The solution here is to create a new type of device that would have enough screen real estate to fit desired screenshot and not crop it vertically nor horizontally.

Another approach to solving this issue, may be using Flutter web or desktop, but it was easier for me to create huge tablet emulator than explore new Flutter environments.

I’ve created new (TV) android emulator with screen size of 25″ and resolution of 3000x4500px. This beast can easily fit all of the screenshots I need.

Android TV emulator running screenshots.

Now, we can look through code samples!

1. The Canvas

Here is the main part of our screenshot, the canvas! It is doing a bit more then just adding a white background.

First of all (1), it is setting the stage of our green screen and center everything inside of it.

Secondly (2), it is setting proper width and height for the real canvas. It is important to note, that we need to divide required screenshot size (in pixels) by the device pixel ratio so that resulting image actually have the width and height we expect. Here we also set the background colour and clip the overflowing edge. TBH, we can skip the clipping, since we’ll crop the whole image using dart’s image library later on.

Next (3), we’re dealing with the localisation of the header text. Since we want the header text to match application language, we need to create Localizations widget and provide it with the configuration. Then, create ScreanshotHeader that is also responsible for the font size and text presentation.

Finally (4), we add the device it self with an embedded screen.

Continue reading

From React-Native to Flutter in 531 Commits

Here is a recording of my FlutterLDN talk about ReactNative and Flutter.

First commit for the HabitChallenge app was created on 27th of July 2017. Back then there were no other choices than to go with react-native and JavaScript.

Since then I did 3220 commits and 244 releases. App was downloaded over 140k times on Google Play and AppStore.

I am considering this a huge success, taking into account that HabitChallenge is my first mobile app and I did virtually no marketing for it!

Long story short on 7th of August 2019 I have decided to start from scratch with Flutter taking all my learning from react-native and writing every single widget and feature once again.

After 531 commits (yes, this is the actual number of commits from git history) on 24th of December, HabitChallenge 5.0 was released on Google Play!

In the talk I am comparing side by side the same widgets implemented in react-native and Flutter. This is a unique real world comparison of two technologies that lets you achieve the same effect… but with different cost.

Which one do you think is more efficient? React-Native? Flutter? You will know my conclusion after watching the talk on YouTube!

How I endedup writing my first mobile app

At the time of writing it is already nine months since I’ve started my adventure with mobile app development and ReactNative in particular.

Before that I’ve wrote an simple Android “stopwatch with reporting over email” app for Megaron. I’ve also wrote full blown iOS app in Swift for my startup, that didn’t went live, although the app was decent! (Side note: as it usually is with tech startups run by tech people we didn’t found a market for it).

As you already know, HabitChallenge is not really my “first” mobile app, but it is first that went live and is actually used by plenty of people around the world.

The story starts back in July 2016, when I’ve broke my tibia bone… That means at least 3 months of lying down in the bed… no walking (at least not without crutches), no running, no going out… My first idea (actually second one, first was not to bother about it and live my normal life… how foolish I was) was “Let’s use this time productively and make as much as possible from it!”. That’s how I started thinking about my first publicly available mobile app.

Why mobile app? There were plenty of reasons:

  • I wanted to learn whole process from idea inception, through implementation, publishing the app, marketing it… and observing how it grows,
  • I always wanted to help other people, create something that would be usable for others,
  • Wanted to learn new technologies and explore this part of software development that I was not yet exposed to,
  • AppStore and Google Play are now huge markets, why not to participate in them,
  • Passive income is a big thing now, and mobile apps sounds like one of the possibilities.

OK, so it would be an mobile app… which platform? iOS or Android? Of course the answer is “both”. Since I was already familiar with development for both of them I know what to expect… and didn’t wanted to play with XML layout files for Android and Storyboard or XIB (which internally are also XML) for iOS; writing UI code manually was also not an option. Lucky on ClojureD conference I’ve heard about ReactNative and that was my weapon of choice 😉

I’ve already said why and how… but “what” is still an open question. It shouldn’t be something big, nor buyer-seller type of app. It should some kind of utility app… or productivity…

Back then I was using HabitLoop to track my habits. It was not the nicest looking app, but it is open sourced has decent set of features and only available on Android. “Yeah! Let’s write yet another habit tracking app!” was my thought… “But it should have some ‘twist’, so that it won’t be a simple clone…”.

At that point I’ve started listing features and picking what will be included in first release (aka. MVP). In about two days I had listed everything, write it down, decided and commit for it.

The first version of HabitChallenge app had:

  • awesome UI and UX (that means I need to find someone to do it for me),
  • habit that can repeat on particular day of week,
  • habit can repeat multiple times per day (eg. drink 7 glasses of water),
  • habit can have multiple reminders,
  • no ads,
  • free version with limits for number of habits, reminders and repetition during the day,
  • in app purchase for the Pro version.

HabitChallenge featured image

Estimated time: 4 weeks, actual time spend: 9 weeks. The first version of HabitChallenge was available for install on AppStore and Google Play on 13th of October 2016.

Just recently HabitChallenge was installed over 10 000 times on Google Play (it took about 5 months to get there). It is used all over the world (although it only supports only Polish and English) and the “twist”, the “killer feature” is still not implemented yet… and I’m still working it 😉

If you manage to read so far… that’s the end 🙂 Please give HabitChallenge a try and if you like it give it 5 starts on Google Play and AppStore 🙂