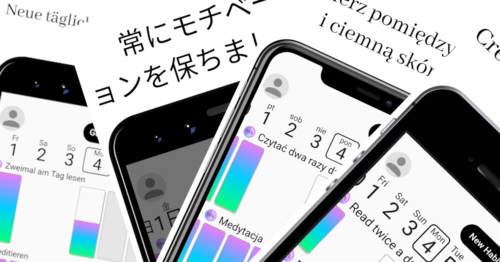
90 App Screenshots in 8 minutes

One of the tedious chores with mobile apps are the screenshots for Play Store and AppStore, especially because this is the only way how you can showcase the app to potential uses. Also as app grew, it may get even more time consuming since the number of screenshots, supported languages, pre-configurations and features increases over time.

As of now, HabitChallenge app has 90 image files representing permutations of presented screens, languages, devices and supported systems. I really DO NOT want to take all of them manually!!

Here is how I’m doing this right now in fully automated way and can get all of the 90 screenshots after each release in about 8 minutes!

HabitChallenge App Screenshots with different screens, in different languages on different devices.

HabitChallenge is written in Flutter right now, and since Flutter controls every single pixel on the screen, has an awesome google_fonts library… and device_frame… and flutter_driver. We can create whole screenshot using dart and flutter!! Without the need for any graphical processing in Photoshop or Gimp! We can upload them straight to the store using fastlane!

OK, let’s stop bragging and dive into technical details!

What are the main ingredients?

  • canvas – each store defines different sizes for app screenshots, this will limit the overall size of the final image, also this is where background colour or image can be set,
  • header text – about 1/5 of the image height is reserved for the localised header text,
  • device frame,
  • featured app screen – localised app screen with example data.

0. The Emulator

Actually, before we even start with a first of line of code, we should think from where we’ll get the images. The first thought is from the phone emulator, as we always work with phone emulators, right?

Not quite so. Yes, we’ll create a screenshot for the phone listing in the store, but we also need to remember that each device (and emulator) have different screen resolution and density. Plus we probably don’t want to be bothering about screen safe areas, status and navigation bar. If we use emulator that have the same screen size as our screenshot, we’ll end up with screenshots slightly shorter.

The solution here is to create a new type of device that would have enough screen real estate to fit desired screenshot and not crop it vertically nor horizontally.

Another approach to solving this issue, may be using Flutter web or desktop, but it was easier for me to create huge tablet emulator than explore new Flutter environments.

I’ve created new (TV) android emulator with screen size of 25″ and resolution of 3000x4500px. This beast can easily fit all of the screenshots I need.

Android TV emulator running screenshots.

Now, we can look through code samples!

1. The Canvas

Here is the main part of our screenshot, the canvas! It is doing a bit more then just adding a white background.

First of all (1), it is setting the stage of our green screen and center everything inside of it.

Secondly (2), it is setting proper width and height for the real canvas. It is important to note, that we need to divide required screenshot size (in pixels) by the device pixel ratio so that resulting image actually have the width and height we expect. Here we also set the background colour and clip the overflowing edge. TBH, we can skip the clipping, since we’ll crop the whole image using dart’s image library later on.

Next (3), we’re dealing with the localisation of the header text. Since we want the header text to match application language, we need to create Localizations widget and provide it with the configuration. Then, create ScreanshotHeader that is also responsible for the font size and text presentation.

Finally (4), we add the device it self with an embedded screen.

Continue reading

Ensure High Code Quality in Flutter

Being one-man-army working on an app has some advantages. There is no deliberation about code formatting, libraries or frameworks used in the project. This is why migrating from react-native to Flutter was an easy decision, I just didn’t need to convince anyone apart from myself ;).

Of course all of those pros are also the cons. There is one that could prevent me from making bad decisions, checking in a bad code or braking old features while implementing new one. There is no one to deliberate about algorithmic, implementation and architectural choices in code review… you get the point?

There are some ways how some of those down sides may be overcome. For example writing unit and functional/integration tests is one of them. Code formatter and analyzer are another two.

Thankfully Flutter comes with all of the bells and whistles. There is flutter format, to automatically format your code, and flutter analyze to analyze code and enforce quality. Even more, both tools comes with awesome pre-build configurations that are used by Flutter team.

Unfortunately there is nothing that would automatically write test for you ;). But fortunately there are high quality and performant test frameworks that lets test your code on:

  • unit,
  • widget (functionality),
  • widget (presentation),
  • integration

levels.

One thing is to have the tools, but another is to use them… When you are part of a bigger team, someone will configure a build and CI/CD system for you, that probably will be running in the cloud. Or you can use something like CodeMagic… But in my situation I try to limit external services that I use with HabitChallenge.

One thing that I loved in my react-native times, was husky project. That lets you easily define and manage git hooks, especially pre-commit hook. This way I was able to run google typescript and unit tests before each commit.

Back in August 2019, there was nothing that may be compared to husky in dart/flutter ecosystem. So I decided to go with a general solution, the pre-commit project. Lets see how we can leverage pre-commit to ensure our code is properly formatted, doesn’t break any analyzer rules and do not break existing unit tests.

Continue reading